
Stream Ray-Ban Meta Glasses to TikTok LIVE Studio
Turn your Ray-Ban Meta smart glasses into a hands-free POV camera for TikTok LIVE. This guide follows the recorded MetaLensAI workflow: send the glasses feed to MediaMTX, open it in Chrome, and capture the Picture-in-Picture window in TikTok LIVE Studio.
Can you stream Meta glasses to TikTok without a TikTok stream key?
Yes, if your account can use TikTok LIVE Studio. MetaLensAI publishes the glasses camera to a local MediaMTX server. Chrome displays that feed, and LIVE Studio captures its Picture-in-Picture window. You go public through LIVE Studio, so this method does not require a TikTok-issued RTMP key.
You still need TikTok LIVE and LIVE Studio access. The local Stream Key in MetaLensAI is a MediaMTX path value, not a TikTok stream key.
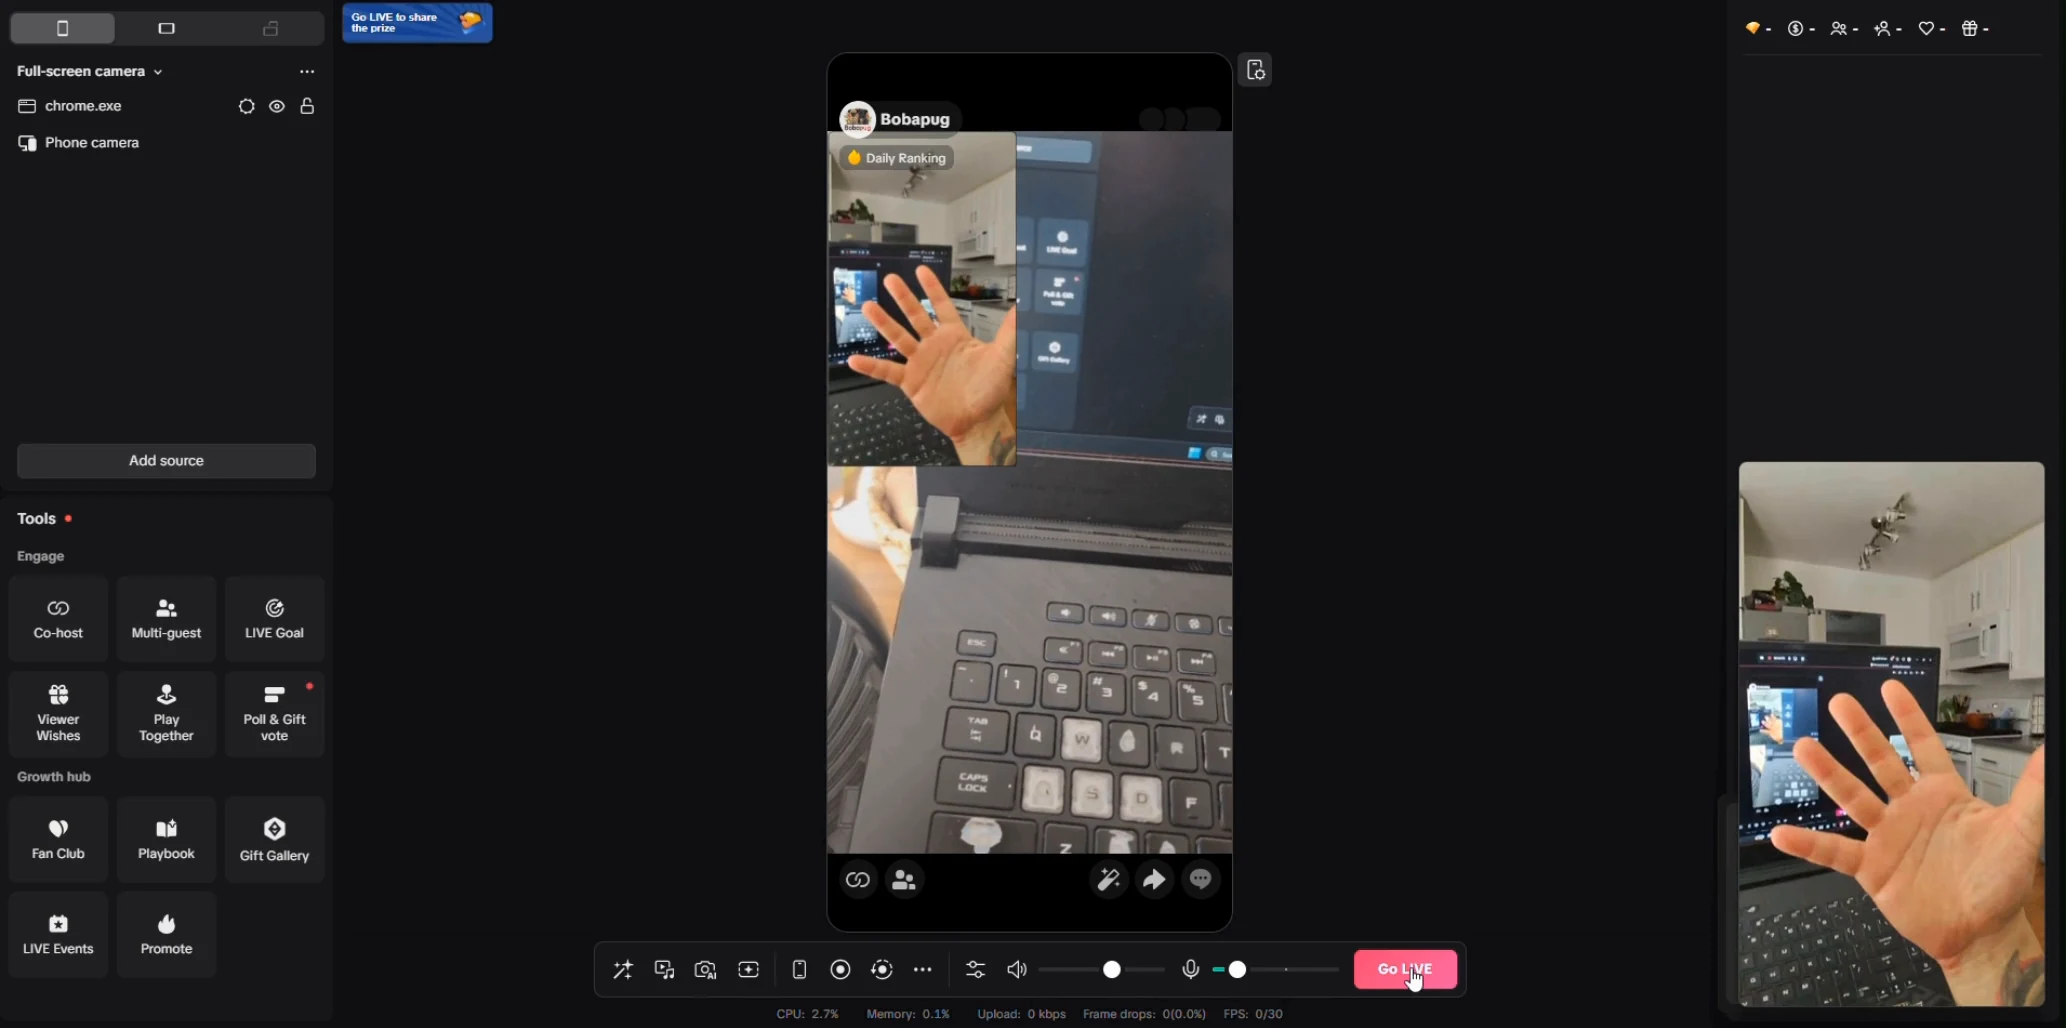
The result: your glasses view inside TikTok LIVE Studio
The final scene in the recording shows the glasses feed inside LIVE Studio and in Chrome’s floating preview. The button still says Go LIVE: this is the working preview to check before you publish.
Watch the complete setup
Use the video alongside the written steps.
Before you start: what you need
- Ray-Ban Meta smart glasses connected to an Android phone, with MetaLensAI installed and ready to use Custom RTMP streaming. Complete the MetaLensAI installation guide first.
- A PC with TikTok LIVE Studio and a TikTok account that can use it. Get the desktop software through TikTok’s official download page.
- MediaMTX on the PC to receive the local feed, plus Google Chrome to display it.
- The TikTok mobile app signed in to the account you use for LIVE Studio, for the Phone camera connection shown in the recording.
- A stable local network. Connect the phone and PC to the same reachable Wi-Fi/LAN. Keep the phone close to the glasses and prepare power for your planned session.
Check your account’s LIVE Studio access before setting up the receiver. See TikTok’s current LIVE requirements.
Understand the two camera sources
The phone connection and the glasses stream do different jobs. Keeping them separate makes the rest of the setup much easier.
On a small screen, swipe the table to see all columns.
| Source | What it supplies | Where it goes |
|---|---|---|
| MetaLensAI → MediaMTX → Chrome | The Ray-Ban Meta glasses camera. | A Chrome Picture-in-Picture window, captured by LIVE Studio. |
| TikTok Phone camera | The phone camera connection shown in the walkthrough. | A separate source in the LIVE Studio scene, underneath the glasses capture. |
| TikTok LIVE Studio | The final arranged scene and audio. | Your public TikTok LIVE broadcast after you click Go LIVE. |
If you prefer to stream using an RTMP Server URL and Stream Key, follow the direct TikTok RTMP guide. The steps below use desktop window capture instead.
1. Install and start MediaMTX on your computer
Open the MediaMTX installation instructions and download the latest standalone archive from the official MediaMTX releases. Then follow the instructions for your operating system.
Windows
- Download the Windows archive that matches your computer’s processor architecture.
- Extract the archive into a permanent folder. Keep
mediamtx.exeandmediamtx.ymltogether. - Open PowerShell in that folder and start MediaMTX with:
.\mediamtx.exe- Keep the PowerShell window open throughout the stream.
- If Windows asks for firewall access, allow MediaMTX on your trusted private network so the phone can connect to it.
macOS
- Check whether your Mac uses Apple silicon or an Intel processor, then download the matching macOS archive.
- Extract the archive into a permanent folder. Keep
mediamtxandmediamtx.ymltogether. - Open Terminal in that folder and start MediaMTX with:
./mediamtx- If Terminal reports
permission denied, runchmod +x ./mediamtxonce, then run./mediamtxagain. - If macOS blocks the first launch, open System Settings → Privacy & Security, allow MediaMTX to open, and start it again.
- Keep the Terminal window open throughout the stream. If macOS asks about incoming network connections, allow them.
On either system, a normal startup includes listeners similar to these:
INF [RTMP] listener opened on :1935
INF [WebRTC] listener opened on :8889 (HTTP), :8189 (ICE/UDP)
INF [HLS] listener opened on :8888
Checkpoint: the RTMP listener is on 1935 and the WebRTC preview is on 8889. Your log format may differ by MediaMTX version. This guide assumes those default ports.
2. Find your computer’s local IPv4 address
MetaLensAI needs the local address of the computer running MediaMTX. Use the instructions for your operating system.
Windows
- Open PowerShell or Command Prompt and run:
ipconfig- Find the Wi-Fi or Ethernet adapter that is connected to your local network.
- Copy its IPv4 Address, for example
192.168.1.56.
macOS
- Open Terminal. For a typical Wi-Fi connection, run:
ipconfig getifaddr en0- Copy the address returned by Terminal, for example
192.168.1.56. - If the command returns no address, open System Settings → Network, select the active connection, open Details → TCP/IP, and copy the IPv4 address shown there.
Use this computer address in MetaLensAI. Do not use localhost on the phone because it would refer to the phone itself. The examples below use 192.168.1.56; replace it with your own IPv4 address.
Connect the phone and computer to the same reachable local network. Guest Wi-Fi with client isolation can prevent the phone from reaching the computer even when both devices show the same Wi-Fi name.
3. Configure MetaLensAI Custom RTMP
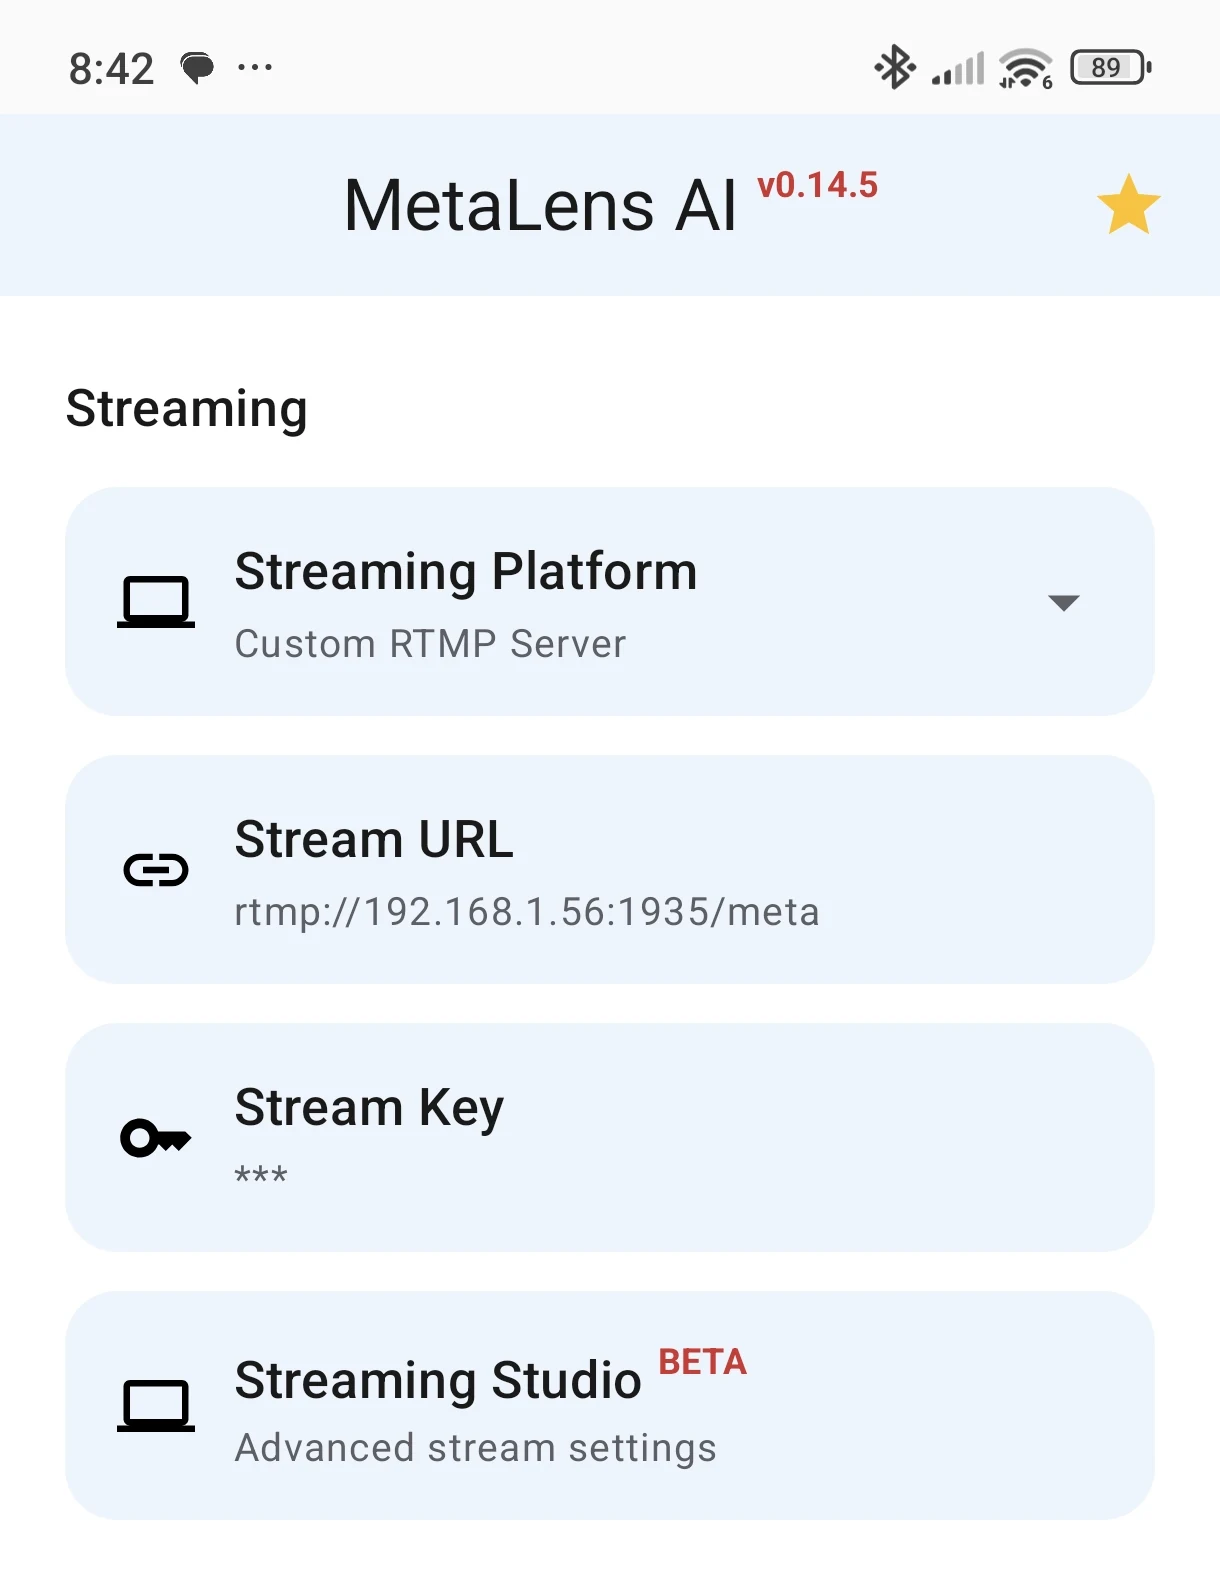
- Open MetaLensAI and go to Settings → Streaming.
- Set Streaming Platform to Custom RTMP Server.
- Set Stream URL to the PC address and MediaMTX’s RTMP port:
rtmp://192.168.1.56:1935/metaSet the local Stream Key to:
testThe resulting MediaMTX path is meta/test. Keep that same path when opening the browser preview.
This is a local key, not a TikTok key. test is an example path value for this receiver. You are not copying a TikTok account credential.
- Return to MetaLensAI’s Home screen and tap Go Live on Custom RTMP Server.
- Choose Performance Mode, as in the local-receiver setup. Confirm the glasses connect and start sending video.
- Check the MediaMTX terminal for a publishing message with the expected path.
INF [RTMP] ... is publishing to path 'meta/test', 2 tracks (...) Checkpoint: MediaMTX reports a publisher on meta/test. If it does not, fix the PC address, network or firewall before continuing.
4. Open the glasses feed in Chrome
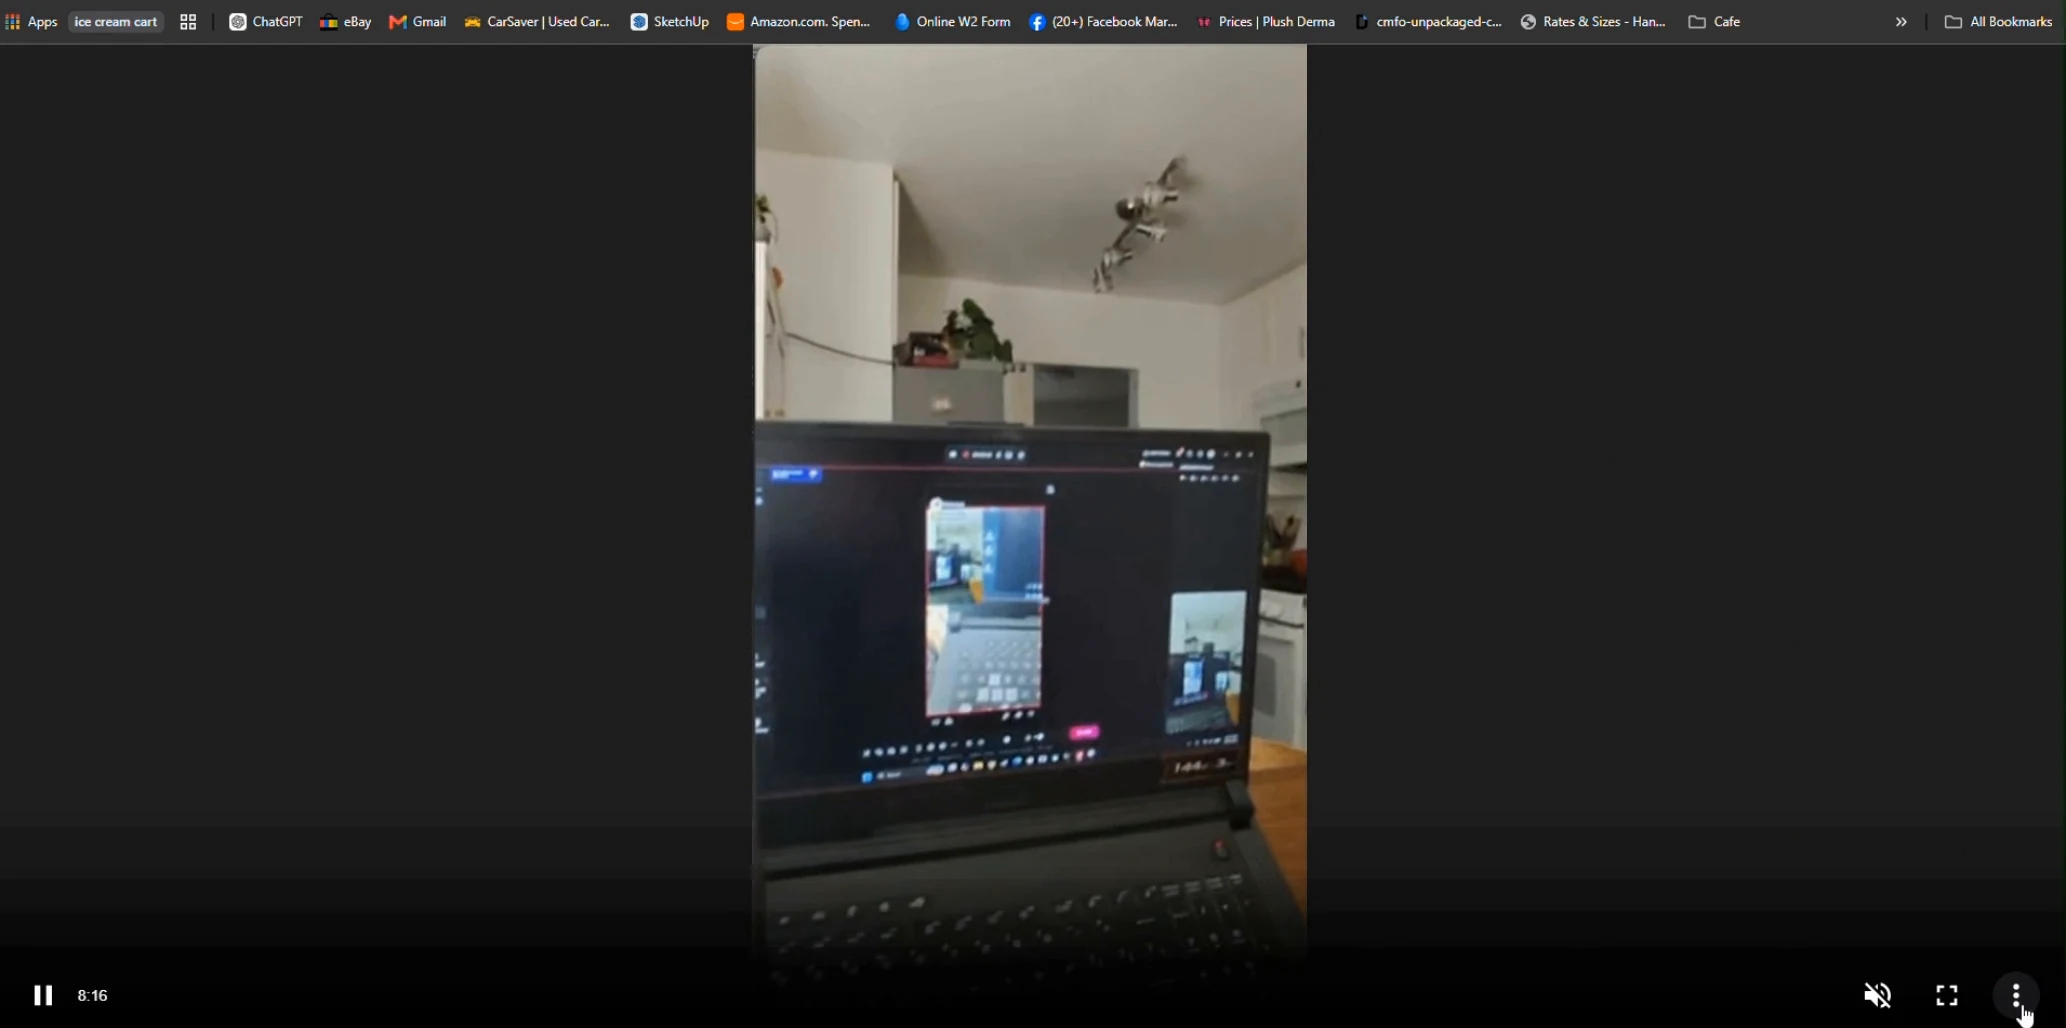
With MetaLensAI streaming, open the MediaMTX WebRTC preview on the PC:
http://192.168.1.56:8889/meta/test- Wait for the glasses video to load. If the player needs a click to start, use its play control.
- Move your hand in front of the glasses to verify that you are seeing a moving feed.
- Keep this tab open. LIVE Studio will capture video from it later.
The recording’s initial local setup follows the MediaMTX steps in the OBS guide. For this TikTok workflow, continue here after the browser-preview checkpoint; you do not need to install OBS.
Browser page opens but the video is black?
Confirm that MediaMTX has an active publisher and try the HLS preview as a comparison:
http://192.168.1.56:8888/meta/testHLS normally adds more delay. It can help distinguish a WebRTC problem from an unavailable source, but it is not a guarantee that every browser can decode the incoming video. Performance Mode may send H.265, whose browser support varies. See the MediaMTX codec notes if the publisher is active but neither preview is usable.
5. Connect TikTok’s Phone camera to LIVE Studio
This follows the Phone camera connection shown at 0:59–2:35 in the video. It is separate from the MetaLensAI glasses feed.
- Open TikTok LIVE Studio on the PC and sign in.
- Prepare the scene you want to use. The example uses a portrait/full-screen-camera layout.
- Click Add source → Phone camera. If the source is already in the scene, open its settings with the gear icon.
- Choose the Wi-Fi connection method. LIVE Studio displays a QR code for that session.
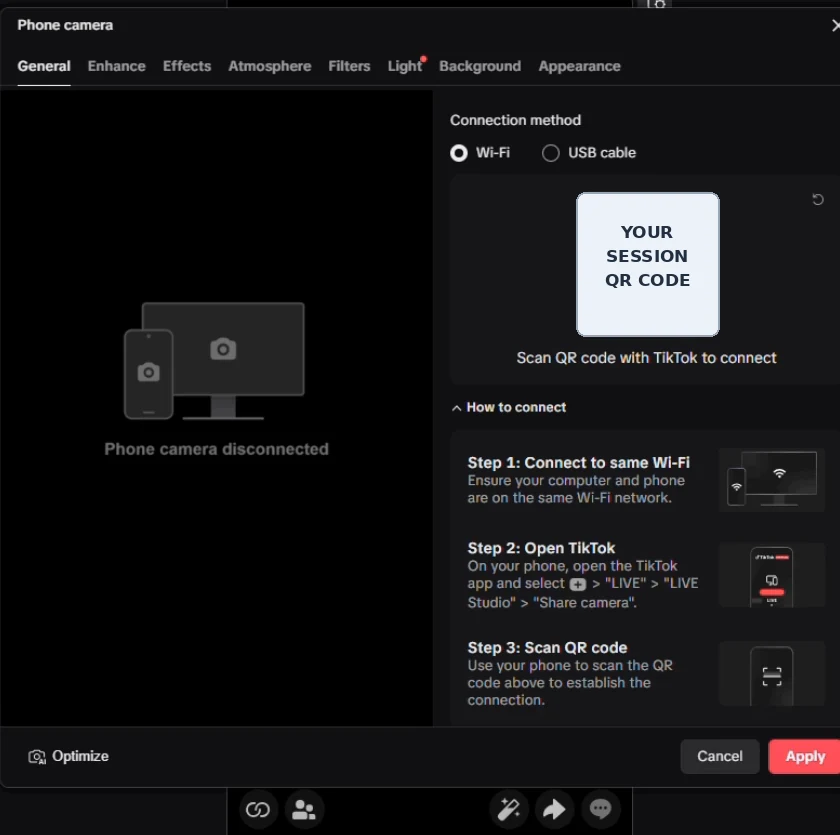
- On the phone, open the TikTok app and tap the + button.
- Choose LIVE. In the LIVE options, swipe to LIVE Studio.
- Tap Share camera, then scan the QR code displayed on the PC using this in-app scanner.
- When LIVE Studio asks you to confirm the connection, click Confirm.
- Wait for the phone camera to appear and click Apply on the PC.
Use the TikTok app’s Share camera scanner, not a general camera QR reader. If LIVE Studio or Share camera is missing, check your account’s access and current TikTok UI before proceeding.
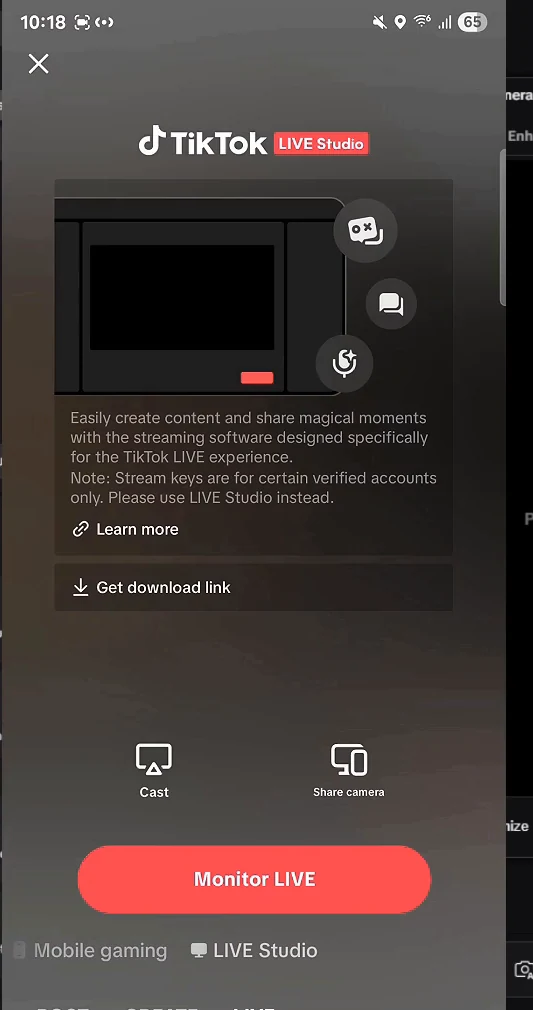
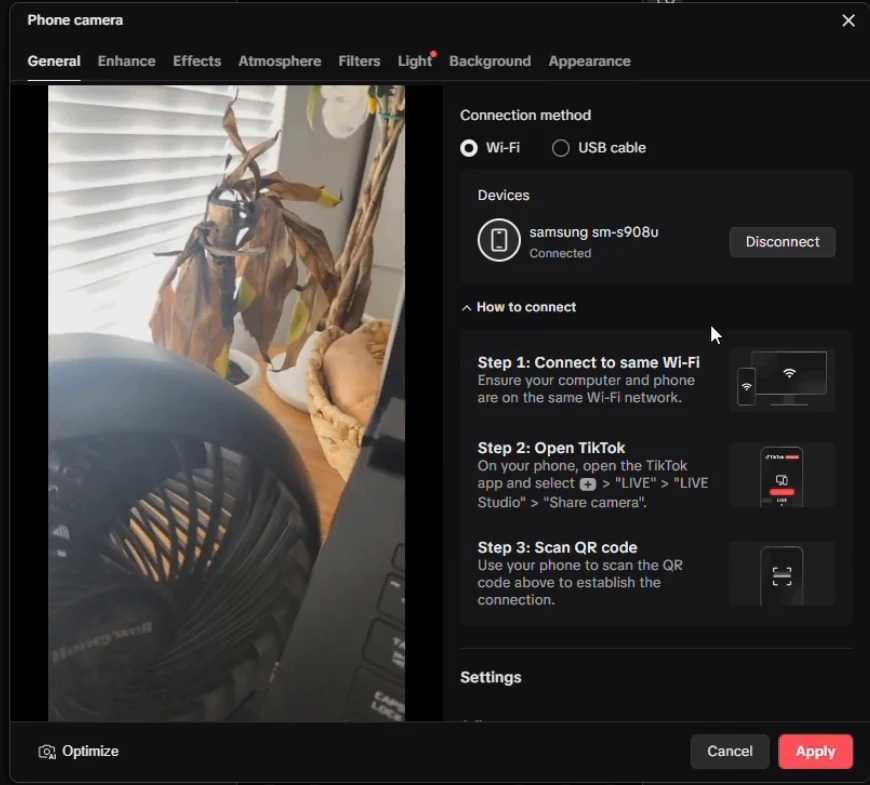
Checkpoint: Phone camera shows the connected phone. You have connected TikTok’s phone source; the camera in your glasses is still coming through MediaMTX and Chrome.
6. Put the Chrome preview into Picture-in-Picture
Return to the MediaMTX browser tab. In the recording, Picture-in-Picture is opened around 3:29 to isolate the glasses video in a floating window.
- Open the video’s menu or Chrome’s video controls and select Picture-in-Picture. The control’s location can vary with Chrome and the player.
- If the first right-click opens only the player menu, a second right-click may show Chrome’s video menu.
- Keep the floating video window open and visible. Do not close the original preview tab.
- Return to LIVE Studio while the Picture-in-Picture window continues playing.
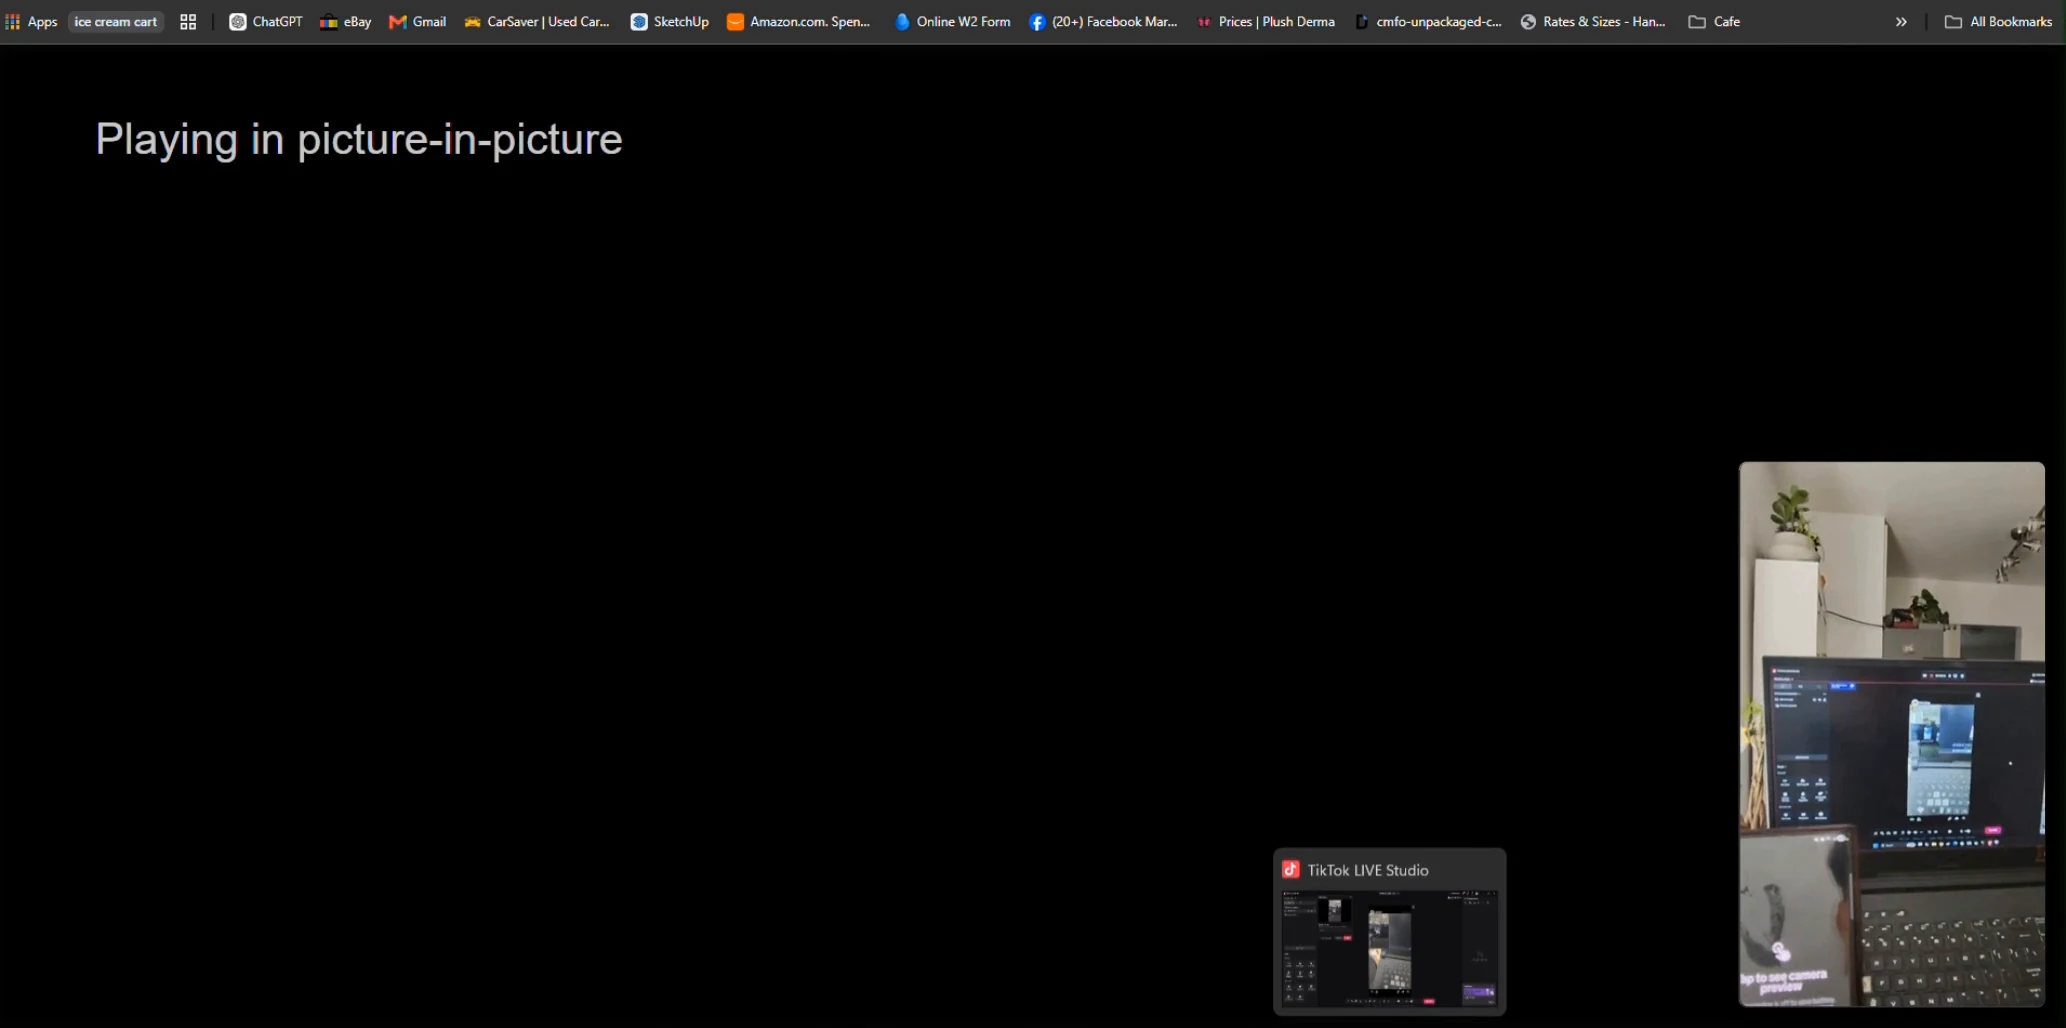
Checkpoint: the floating window shows moving glasses video. The browser may say Playing in picture-in-picture in its main player.
7. Add Window capture and select the PiP window
- In LIVE Studio, click Add source → Window capture. Use Window capture for this method so you can select the individual program window.
- Add the source, then open its settings/gear icon.
- Under Select program, choose the Chrome Picture-in-Picture entry. The recording shows chrome.exe Picture in picture.
- Check the source preview and click Apply.
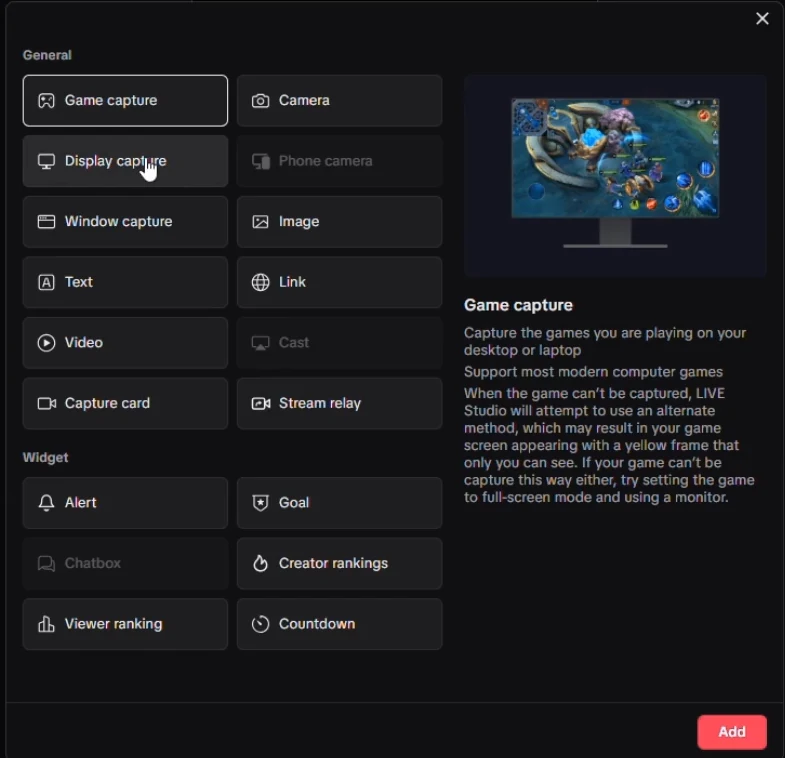
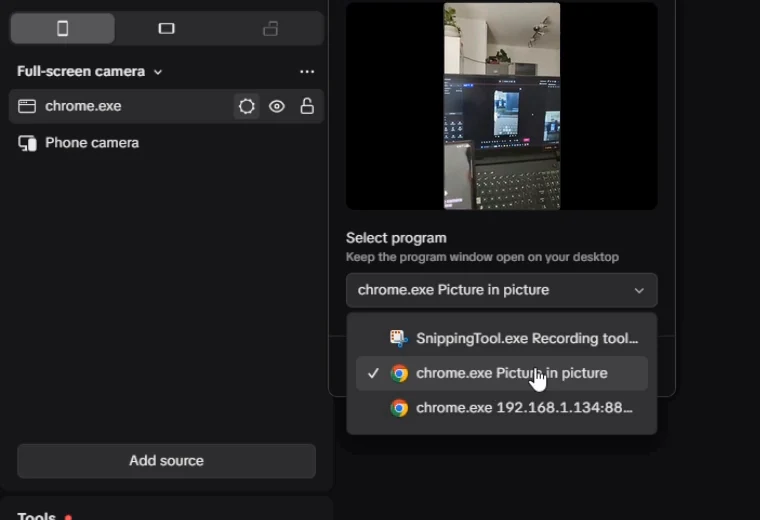
Checkpoint: LIVE Studio shows the glasses video as a separate captured source. If you see browser tabs or your entire desktop, check the selected source and program window.
8. Bring the glasses source forward and fit the canvas
- Select the new captured source in the preview or source list.
- Open its context menu and choose Layer → Bring forward. Repeat as needed, or use Bring to front, so it sits above Phone camera.
- Resize and center the glasses feed in the portrait canvas. Preserve the image’s aspect ratio instead of stretching it.
- Use the canvas’s alignment/crop controls if you need a tighter composition. Check the full scene: an exposed phone-camera background may still be visible around a small glasses overlay.
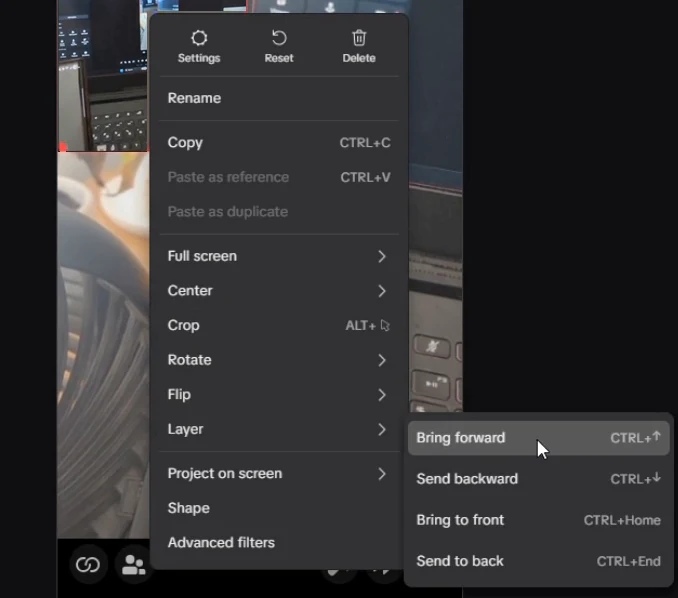
The floating Chrome window is the input; the scene canvas is the output. Resizing one can affect the capture’s shape, so check the final scene after you change either.
9. Verify the feed and check audio before publishing
The recording briefly stops and restarts the stream, then reaches a clear working preview at 4:41–4:48. Wait for the input to recover before you press Go LIVE.
- Video: move your hand in front of the glasses. The browser/PiP feed and LIVE Studio capture should update.
- Source: confirm you are capturing the glasses window, not accidentally showing only the phone camera.
- Framing: look for clipped edges, an uncovered background and unwanted browser controls.
- Audio: choose the intended microphone/audio route in LIVE Studio and watch its meters. Window capture alone should not be treated as proof that glasses audio is included.
- Echo: avoid capturing the same sound through multiple microphones or through both speakers and a microphone.
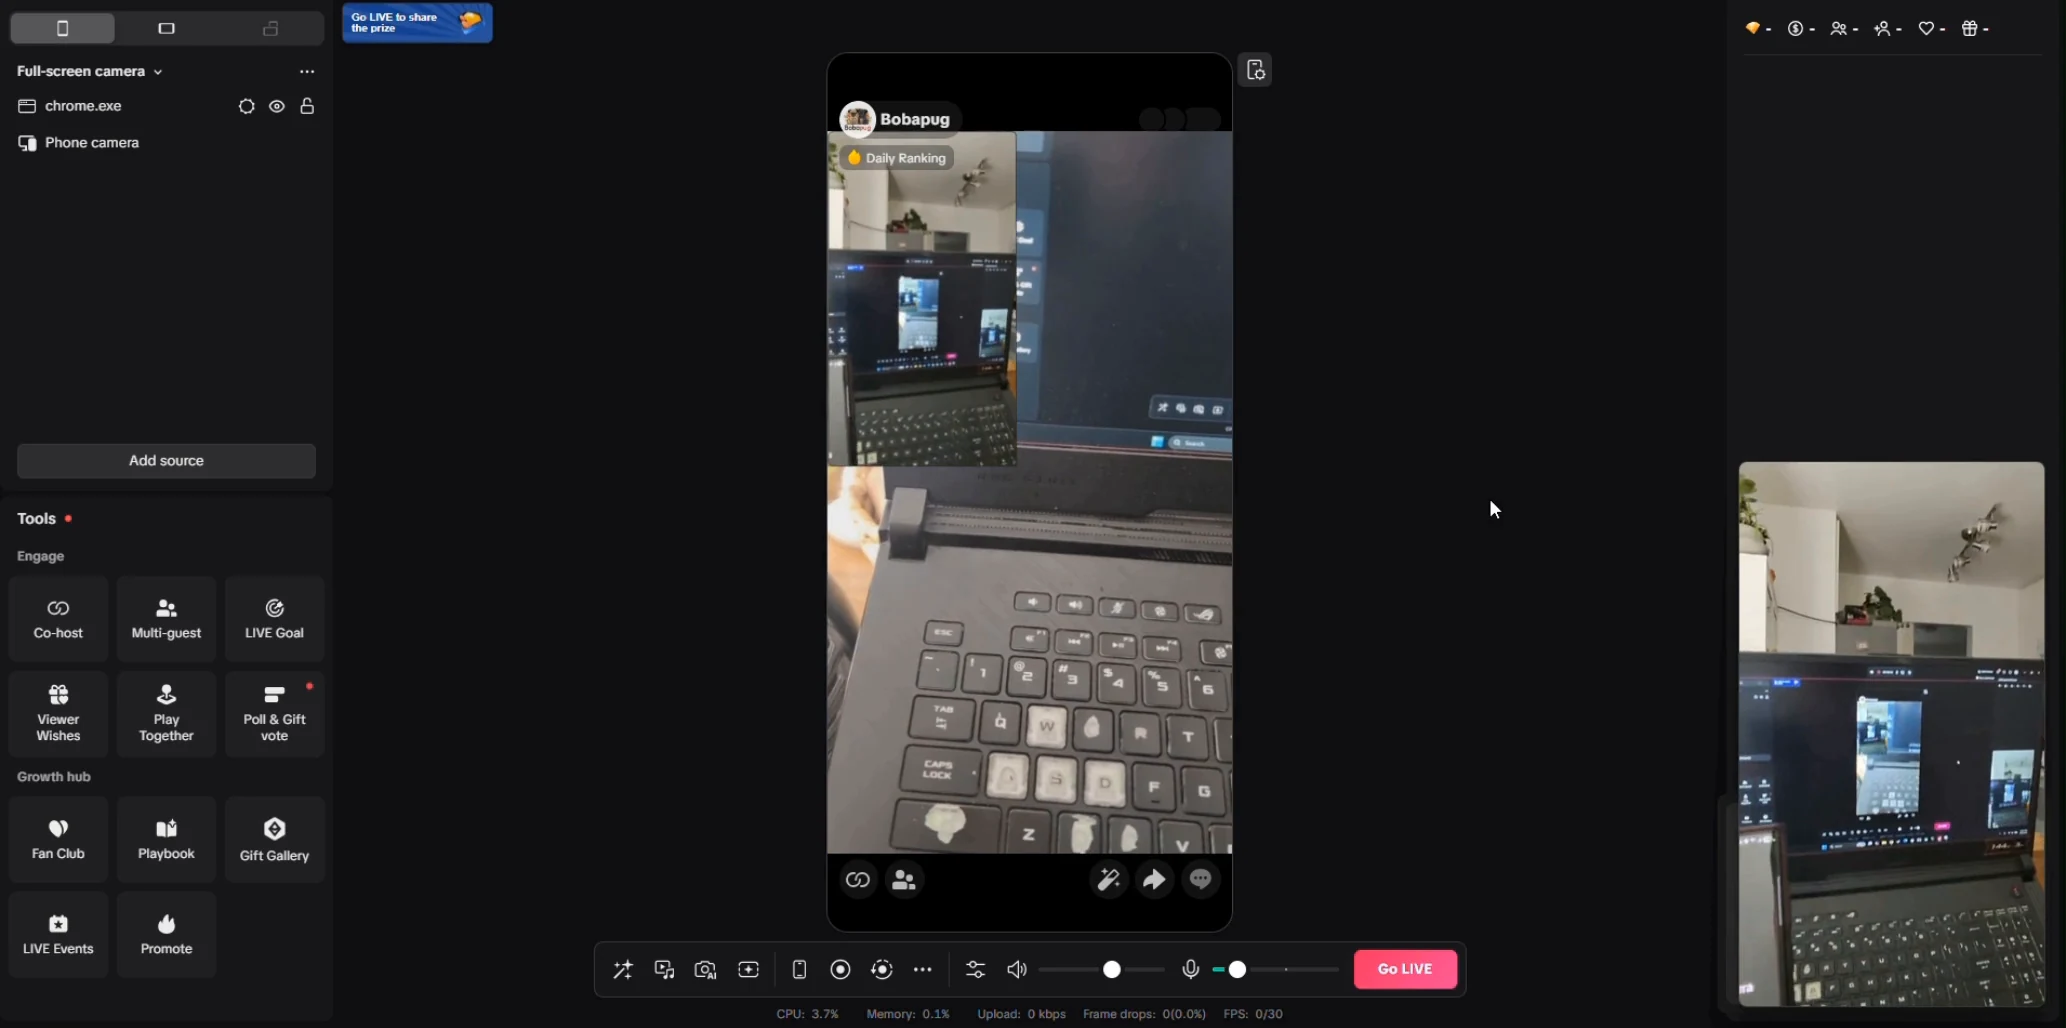
If you restart MetaLensAI, expect a temporary blank/frozen capture while the connection recovers. Confirm the browser preview first, then LIVE Studio. The restart shown in this particular recording is a recovery step, not a guarantee against every pixelation problem.
10. Go LIVE from TikTok LIVE Studio
- Review the final scene, LIVE title/category and audio controls.
- Click Go LIVE in TikTok LIVE Studio and complete any final confirmation TikTok shows.
- Confirm the broadcast status in TikTok. If available, check the viewer-facing result from a second device.
- Keep MediaMTX, MetaLensAI, Chrome’s preview tab and Picture-in-Picture window running during the session.
- When finished, end the broadcast in TikTok and stop the local stream in MetaLensAI.
Two different Go Live buttons: MetaLensAI’s button starts the local camera feed to MediaMTX. LIVE Studio’s button publishes the prepared scene to TikTok.
Troubleshooting: start at the first broken checkpoint
On a small screen, swipe the table to see all columns.
| Symptom | Check this first |
|---|---|
| No MediaMTX publishing message | Verify that the server is running, the phone can reach the PC’s IPv4 address, port 1935 is allowed on the private network, and the MetaLensAI URL/key match meta/test. |
| Browser preview is empty | Check for an active publisher and the exact preview path. If the page loads but video does not, check codec support and compare the HLS preview on port 8888. |
| Phone camera will not connect | Use the same local network, the TikTok in-app Share camera scanner, and a fresh QR code from your own LIVE Studio session. Confirm on the PC. |
| PiP is missing from Select program | Open and play the browser preview, launch Picture-in-Picture, keep that window open, then reopen the capture settings and select it. |
| LIVE Studio shows the phone instead of the glasses | Move the PiP capture above Phone camera with Layer → Bring forward/Bring to front. Check that the intended capture is visible. |
| Capture goes black after a restart | Wait for the glasses stream to reconnect. Verify moving video in Chrome and then reselect the PiP window if LIVE Studio does not recover. |
| Blur or pixelation | Compare Chrome with LIVE Studio. If both are affected, check the phone–glasses proximity and local network stability. If pixelation appears, stop the stream in MetaLensAI and tap Go Live again to reconnect. If only the captured scene is affected, check the source selection, sizing and capture quality. |
| Video works but audio does not | Verify the selected LIVE Studio audio source and its meters. Video-window selection and audio routing are separate checks. |
Protocol references: MediaMTX browser playback and WebRTC codec/connectivity notes. You do not need to forward router ports for the local-network setup described here.
Ray-Ban Meta → TikTok LIVE: quick answers
Should I use 192.168.1.56 and /meta/test exactly?
No. The IP address 192.168.1.56, the Stream URL rtmp://192.168.1.56:1935/meta and the Stream Key test are examples. Your computer will probably have a different local IPv4 address, so replace 192.168.1.56 with the address you found in step 2. You can also choose different MediaMTX path and key values, but use the resulting path consistently in MetaLensAI and all MediaMTX preview URLs. With the example values above, the complete path is /meta/test.
Can Ray-Ban Meta glasses stream to TikTok LIVE?
Yes. MetaLensAI can send the glasses camera to MediaMTX on your PC. Open that feed in Chrome, capture its Picture-in-Picture window in TikTok LIVE Studio, and publish from LIVE Studio. Your TikTok account must have access to LIVE and LIVE Studio.
Do I need a TikTok stream key for this method?
No TikTok RTMP stream key is needed for the LIVE Studio window-capture workflow shown here. MetaLensAI still uses a local Custom RTMP URL and a local stream-path key, such as test, to publish to MediaMTX. That local value is not a credential issued by TikTok.
Does this unlock TikTok LIVE or remove follower requirements?
No. You still need to meet TikTok’s current LIVE requirements and have access to LIVE Studio. This guide changes how the camera feed enters LIVE Studio; it does not grant account permissions.
Do I need OBS Studio?
No. This workflow uses MetaLensAI, MediaMTX, Chrome and TikTok LIVE Studio. OBS is a separate option for creators who want its scenes and production tools.
Why do I add Phone camera if I want the glasses camera?
The recorded example connects the TikTok phone app to LIVE Studio through Phone camera and a session QR code. The glasses feed is a separate Window capture source placed above that phone-camera source. MetaLensAI supplies the glasses video, not the Phone camera source.
Why use Chrome Picture-in-Picture?
Picture-in-Picture puts the MediaMTX video in its own window. LIVE Studio can capture that window instead of the browser’s address bar, tabs or an entire desktop. Keep both the preview tab and the Picture-in-Picture window open.
What should I do if the preview freezes or looks pixelated?
Check the original MediaMTX browser preview first. If it is affected too, check the local connection, keep the phone near the glasses, and stop and restart the MetaLensAI stream before going public. If the browser is clear but LIVE Studio is not, reselect the Picture-in-Picture window and check capture size. Restarting may recover the feed, but is not a fix for every network or codec problem.
Can I stream away from my home Wi-Fi?
The setup shown uses a reachable local MediaMTX server and a phone-to-PC Wi-Fi connection. Stay on that network for this workflow. A mobile or remote setup needs a different network arrangement; a private home IP address will not be reachable after you switch to mobile data.
Will Window capture automatically include the glasses microphone?
Do not assume it will. Check the audio sources and meters in LIVE Studio and test the sound independently. Use the intended microphone or supported application-audio capture, and avoid routing the same audio twice. The recorded walkthrough mainly demonstrates the video setup.